You can also find this information in the Aircall Developer documentation: Format your contact numbers in HubSpot automatically using scheduled workflows.
Overview
When your leads flow into HubSpot from multiple sources, their phone numbers can appear in inconsistent formats. This guide explains how to use HubSpot Workflows to automatically reformat phone numbers into the E.164 international standard, ensuring consistency and improving call logging accuracy with Aircall.
The E.164 format is the internationally recognized standard for phone numbers. Saving your contacts’ phone numbers in this format ensures Aircall can accurately identify and match calls to the correct contact or company in HubSpot. This helps display the right information on insight cards and prevents the creation of duplicate contacts.
Important: HubSpot automatically reformats numbers according to local standards based on region. This cannot be disabled. Even though the number may appear unchanged in the HubSpot property field, the backend data will reflect the E.164 format. Aircall references this backend (endpoint-calculated) phone number when logging calls and fetching contact data, ensuring correct call logging behavior.
Requirements
Before getting started, make sure you have:
An active Aircall-HubSpot integration. For setup instructions, see Installing your HubSpot integration.
Access to HubSpot Operations Hub and HubSpot Workflows (available on Professional and Enterprise plans).
Previous experience with creating HubSpot Workflows.
Tip: If you need assistance implementing this workflow or would like to explore more automations, you can book time with our Technical Consultants through the Professional Services page.
Checking phone number field usage
Before building your workflow, identify the most frequently used phone number fields in HubSpot. These fields will be used to trigger your automation.
We strongly recommend completing this step if you use custom phone number fields to store contact numbers. However, in most cases, the standard Phone number and Mobile phone number fields will be predominant.
Steps:
In HubSpot, go to the Reports drop-down menu.
Select Data Management > Data Quality.
Under Data Quality, click Property Insights.
- Scroll down to Properties to review and enter Phone number in the search bar to bring up the relevant phone fields
Review the Fill Rate (%) column to see which phone number fields are most used.
Note: You must create a separate workflow for each phone number field you plan to update, whether the field is standard (Phone number, Mobile phone number) or custom. We recommend using Property Insights to identify the predominant fields first; in most accounts, the standard fields are the most used. When copying the string value later in this guide, make sure it is copied into the native Phone number or Mobile phone number fields in HubSpot, as Aircall only logs calls against those fields.
Creating the number reformatting workflow
Once you have identified your main phone number fields, you can build workflows to reformat them. The workflow consists of several actions, but three are essential:
Schedule trigger: defines when and how often the workflow runs
Enrollment trigger: determines which records are included
Format data: performs the actual reformatting of phone numbers
Important: Aircall only logs calls against numbers stored in HubSpot’s native Phone number or Mobile phone number fields, not custom fields. When it comes to copying the string value later in this guide, you will have to ensure it is copied into the Phone number or Mobile phone number fields native to HubSpot.
Step 1: Create a Scheduled Workflow
In HubSpot, go to Workflows and select Create a new workflow > Contact-based > Schedule.
Set your Schedule trigger to define how frequently and and when you would like the numbers to be automatically reformatted. This will automatically add the Schedule Trigger to the workflow.
-
We recommend scheduling the workflow outside business hours to prevent any possible disruption to your daily operations.
Step 2: Set the Enrollment Trigger
We will now set up the Enrollment Trigger using the phone number field you determined to be the dominant one as the singular contact property. The trigger should be set up as follows:
On the Contact enrollment trigger action, select Set up triggers.
In the right-side panel, choose Contact properties under Filter type.
Under Contact information, search for the phone number field you identified earlier.
-
Set the workflow to trigger when the selected phone number field is known.
Step 3: Format the phone number data
Use the Format Data action to clean and standardize phone numbers by trimming whitespace and removing unnecessary characters.
trim: removes leading and trailing whitespace
cut: removes specific characters
Common unwanted characters include: -, (, ), and spaces.
If additional characters are used in your phone numbers, ensure your formula accounts for them. Each character requires its own cut function.
Tip: If you’re already familiar with creating custom formulas in HubSpot, you can enter the completed formula directly. Otherwise, continue reading for detailed guidance.
Steps to build the custom formula
Select Format Data as the next action in your workflow and toggle on Custom Mode. We highly recommend turning on Formula Guidance for visual assistance and error warnings while building the formula.
Click Insert > Function > trim.
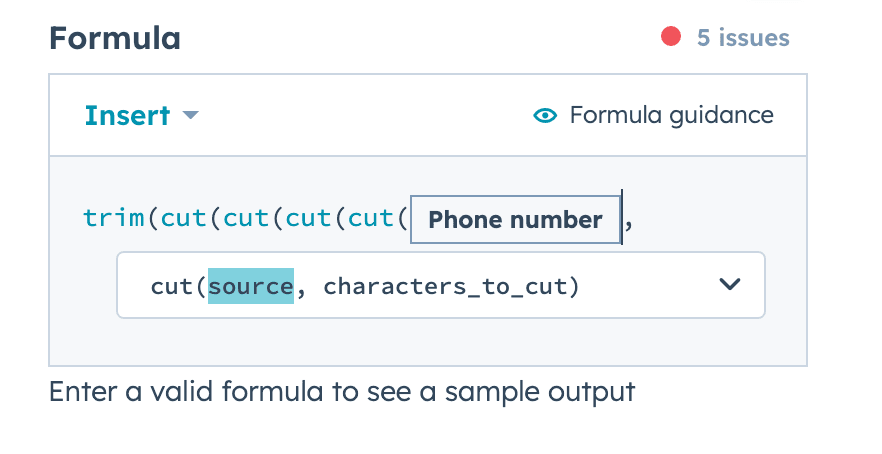
- Working off the assumption that the only characters we need to remove are the 4 mentioned above, we need to add 4 cut functions next. Click on Insert > Function and select cut. Repeat this 3 more times for a total of 4.
- It's expected the formula guide will indicate issues at this point, as we have not completed the workflow.
Now, we have to add the source. In this case, the source is the phone number property from the first step in the workflow.
Click Insert > HubSpot Property, select your phone number field, and add a comma after it.
-
Add the characters to be removed, following these rules:
Commas must be followed by spaces.
Characters must be inside quotation marks.
Each function must close with a parenthesis.
Example:
, "-")
, "(")
, ")")
, " ")
Close all parentheses. The formula guide should display “no issues.”
Save your formula and return to the workflow.
Step 4: Copy the formatted number back
We now have to take the cut and trimmed value and put it back into the Phone number or Mobile phone number field using the action Copy property value.
Add a Copy property value action.
For Property or value to copy from, select Format data > [String] value.
Set the Target object to Contact.
For Property to copy [String] value to, choose Phone number or Mobile phone number.
Click Save.
Step 5: Add a + for E.164 compliance
The E.164 format requires numbers to begin with a +. We will use the If/Then branching action to handle cases where some numbers already have a + and some do not.
Add an If/then branch action in the workflow.
-
Configure two branches:
- For the first branch, set the branch name to Has + and set the filter type to Contact properties > Phone number > starts with any +
-
For the second branch, utilize the default HubSpot branch if none of the criteria are met and set the branch name to No +, meaning any phone number without a + at the beginning will fall into this branch
For the Has + branch, no further action is needed.
For the No + branch:
Select Format Data and toggle on Custom Mode. We are revisiting the custom formula, but this time with a new function called Concat.
Click Insert > Function > Concat.
Type
"+", then click Insert > HubSpot Property and select the same phone number field.Close the formula with
).
5. To complete the workflow, we have to copy the [String] value again. Repeat the step above following the slight difference below:
- Select Copy property value.
- Property or value to copy from → 4.
- Format Data > [String] value Target Object= Contact Property to copy [String] value to= Phone number or Mobile number
Testing the workflow
To test the setup:
Create a test contact with a mock phone number that includes special characters such as
(,), or-.Manually enroll this contact in the workflow.
Once the workflow completes, the visible phone number in HubSpot may appear unchanged due to automatic local formatting, but the backend value will be correctly formatted in E.164.
Aircall references this backend-calculated phone number when logging calls and retrieving contact data. As long as this value is in E.164 format, you can expect consistent and accurate call logging.
Note: HubSpot’s local number formatting cannot be disabled. Even though the number may look the same in the property field, the backend value will reflect the correct E.164 format used by Aircall.
Adding country codes
If your contact numbers do not already include a country code, you can create an additional workflow to add one.
Tip: If all your contacts are in the same country (for example, +44 for the UK), you can easily prepend this code in a workflow. If you manage contacts from multiple countries, consider automating this process by referencing a country code field on each contact.